Battery switch on travel trailer function is crucial for managing your RV’s power. Understanding how these switches work—whether single, dual, or rotary—is key to preventing battery drain and keeping your appliances running smoothly. This guide breaks down the different types, their advantages and disadvantages, and how to troubleshoot common problems. We’ll cover everything from installation to maintenance, ensuring you’re confident in handling your travel trailer’s electrical system.
From basic functionality to advanced troubleshooting, we’ll equip you with the knowledge to confidently manage your RV’s power. We’ll explore wiring diagrams, safety precautions, and even help you choose the right switch for your specific needs. Get ready to become a power management pro!
Types of Battery Switches in Travel Trailers
Choosing the right battery switch for your travel trailer is crucial for managing your power sources efficiently and safely. Different switches offer varying levels of control and complexity, each with its own set of advantages and disadvantages. Understanding these differences will help you select the best option for your needs.
Single Battery Switches
A single battery switch is the simplest type. It’s a basic on/off switch that controls the power flow from your trailer’s battery to the 12-volt systems. This is suitable for trailers with only one battery. They are inexpensive and easy to install. However, they lack the flexibility to manage multiple batteries or isolate them for maintenance.
Dual Battery Switches
Dual battery switches are designed for trailers with two batteries. These switches typically allow you to switch between using one battery, both batteries, or neither battery. This setup provides greater flexibility and allows for independent management of batteries, which is useful for charging one while using the other, or for isolating a faulty battery. They’re more versatile than single switches but still relatively straightforward to use.
Rotary Battery Switches
Rotary switches offer a more sophisticated approach to battery management, particularly beneficial for trailers with multiple batteries (often two or three). They typically feature several positions, allowing you to select which battery (or combination of batteries) is powering the trailer’s 12-volt system, or to completely disconnect all batteries. This allows for more precise control and prevents accidental drain on a battery.
They often have a “start” position that connects the battery to the starting system for your engine. However, they can be more complex to operate than simpler switches.
Electronic Battery Switches
Electronic battery switches provide the most advanced control. These often incorporate digital displays and allow for more complex configurations and monitoring features. Many electronic switches offer features like remote control, battery voltage monitoring, and low-voltage alerts. While offering the most control, these are typically more expensive and may have a steeper learning curve than simpler mechanical switches.
Comparison Table of Battery Switches
| Type | Advantages | Disadvantages | Common Brands |
|---|---|---|---|
| Single Battery Switch | Simple, inexpensive, easy to install | Limited functionality, only suitable for one battery | Various generic brands |
| Dual Battery Switch | Simple, manages two batteries, allows for independent use/charging | Limited compared to rotary or electronic switches | Blue Sea Systems, Perko |
| Rotary Battery Switch | Versatile, manages multiple batteries, often includes a start position | Can be more complex to operate than simpler switches | Blue Sea Systems, Perko, Guest |
| Electronic Battery Switch | Advanced control, monitoring features, remote control options | More expensive, potentially complex to learn | Blue Sea Systems, Victron Energy |
Wiring and Installation of Battery Switches
Installing a battery switch in your travel trailer is a crucial step in managing your power system. It allows you to isolate your house batteries from the chassis battery and each other, preventing unwanted drain and improving safety. This section details the typical wiring and a step-by-step installation process.
A typical wiring configuration involves connecting the battery switch between your batteries and the rest of your trailer’s electrical system. This setup allows you to switch power on and off to the house batteries independently, providing control over power consumption and preventing accidental discharge. Remember to always disconnect the negative (-) terminal first when working with batteries to avoid short circuits.
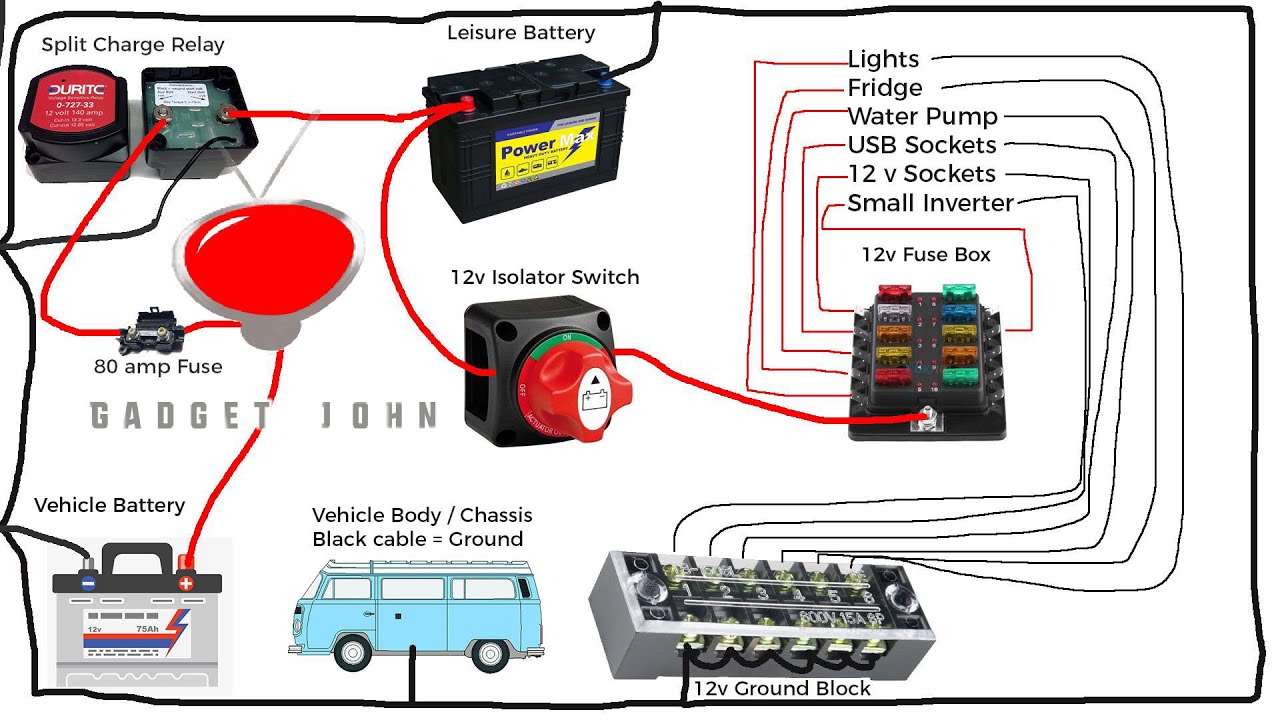
Typical Wiring Configuration
The following diagram illustrates a common wiring setup for a dual-battery system with a battery switch. This configuration shows a 1-2-Both switch, which offers flexibility in choosing which battery or combination of batteries to use.
                                      +-----------------+
                                      | Battery Switch |
                                      +--------+--------+
                                              |
                                              |  "1" Position: Battery 1 Only
                                              |  "2" Position: Battery 2 Only
                                              |  "Both" Position: Batteries 1 & 2
                                              |
             +---------+                 |                 +---------+
             | Battery 1|-----------------|-----------------| Battery 2|
             +---------+                 |                 +---------+
                    |                     |                     |
                    |                     |                     |
                    +---------------------+---------------------+
                                              |
                                              |
                                      +--------+--------+
                                      |    Load (House System)    |
                                      +-----------------+
Step-by-Step Installation
Installing a battery switch requires careful attention to safety and proper wiring. Always disconnect the negative (-) terminal from your batteries before beginning any work. This minimizes the risk of accidental short circuits.
- Prepare the location: Choose a secure, dry location for the switch, ideally accessible but protected from the elements. Ensure adequate space for wiring connections.
- Mount the switch: Securely mount the battery switch using appropriate hardware. Ensure it’s firmly attached and won’t vibrate loose during travel.
- Connect the batteries: Connect the positive (+) and negative (-) cables from each battery to the appropriate terminals on the switch. Use appropriately sized and insulated wire.
- Connect the load: Connect the positive (+) and negative (-) cables from your trailer’s electrical system (house loads) to the output terminals of the switch.
- Secure wiring: Use appropriate connectors and cable clamps to secure all wire connections and prevent them from coming loose. Properly route and manage the wiring to avoid pinching or damage.
- Test the system: After connecting everything, carefully test the switch in each position (“1,” “2,” “Both,” or Off) using a multimeter to verify correct operation and absence of short circuits. Make sure the switch correctly isolates the batteries as needed.
- Reconnect the negative terminals: Once you have confirmed everything is working correctly, reconnect the negative (-) terminals to your batteries.
Simple Wiring Diagram
This diagram simplifies the connections, showing the essential components: the battery switch, two batteries, and the house load (representing all the electrical components in your travel trailer).
So, you’re planning a trip? Awesome! Don’t forget travel insurance! Check out Aon travel insurance for comprehensive coverage. They’ve got options to suit various budgets and trip lengths. Speaking of options, if you’re booking through a tour operator, see if they offer Aon travel insurance as part of their package; it often simplifies the process.
Either way, getting insured is a smart move – peace of mind is priceless!
                 +-----+     +-----+
                 |Batt 1|-----|SW|-----|House Load|
                 +-----+     |   |     +-----+
                         +-----+
                         |Batt 2|
                         +-----+

Where:
Batt 1 = Battery 1
Batt 2 = Battery 2
SW = Battery Switch
House Load = All electrical components in the trailer
Battery Switch Maintenance and Care

Keeping your travel trailer’s battery switch in top condition is crucial for reliable power and preventing costly repairs down the road. Regular maintenance ensures your batteries charge correctly, your appliances function as expected, and you avoid potentially dangerous electrical issues while on the road. Neglecting maintenance can lead to corrosion, poor connections, and even switch failure.
Regular inspection and cleaning of the switch and its connections are essential preventative measures. Corrosion buildup on the terminals is a common problem, especially in humid environments. This corrosion restricts current flow, reducing charging efficiency and potentially damaging your batteries or switch. Dirt and debris can also interfere with proper contact, leading to similar issues.
Battery Switch Inspection and Cleaning
Visually inspect the battery switch regularly, ideally before and after each trip. Look for signs of corrosion (greenish or whitish buildup) on the terminals and the switch itself. Check for loose connections, damaged wires, or any physical damage to the switch housing. Use a wire brush or a specialized contact cleaner to remove corrosion and debris from the terminals and the switch contacts.
Remember to disconnect the battery before performing any cleaning or maintenance on the switch. After cleaning, apply a thin layer of dielectric grease to the terminals to prevent future corrosion and improve conductivity. This grease creates a barrier that repels moisture and prevents the buildup of corrosion. Always ensure that the terminals are securely tightened after cleaning and applying grease.
Testing Battery Switch Functionality with a Multimeter, Battery switch on travel trailer function
A multimeter is a valuable tool for verifying the proper operation of your battery switch. Before beginning, always disconnect the negative battery terminal to prevent accidental shocks. The following steps Artikel how to test your battery switch. First, set your multimeter to measure DC voltage. Then, connect the red lead of the multimeter to the positive (+) terminal of your battery and the black lead to the negative (-) terminal.
Record the voltage reading. This represents the battery’s voltage when the switch is “off.” Next, turn the battery switch to the “on” position. With the multimeter still connected, check the voltage reading at the output terminals of the switch. This voltage should be similar to the reading you obtained before turning the switch on. A significant voltage drop indicates a problem with the switch or its connections.
A significant difference between the readings indicates a problem with the switch or its wiring. If the voltage is significantly lower than the battery’s voltage, it may indicate a problem with the switch, connections, or wiring.
Addressing Issues Identified During Testing
If your multimeter reveals a problem, such as a significant voltage drop, you’ll need to investigate further. This might involve inspecting the wiring for damage or loose connections, cleaning the switch terminals more thoroughly, or replacing the switch if necessary. If you’re uncomfortable working with electrical systems, it’s best to consult a qualified RV technician. Remember to always disconnect the battery before undertaking any repairs or replacements.
Selecting the Right Battery Switch: Battery Switch On Travel Trailer Function
Choosing the correct battery switch for your travel trailer is crucial for safe and reliable power management. The wrong switch can lead to overheating, electrical fires, or simply not function as intended, leaving you stranded without power. This section will guide you through the key considerations to ensure you select a switch perfectly suited to your needs.
Several factors influence the selection of an appropriate battery switch. Primarily, you need to consider the amperage requirements of your system, the type and number of batteries you’re using, and the overall design and features offered by different models. Matching these elements correctly will ensure longevity and prevent problems.
So, you’re planning a trip? Awesome! Don’t forget travel insurance! Check out Aon travel insurance for comprehensive coverage. They’ve got options for everything from lost luggage to medical emergencies. And if you’re looking for a bit more of a luxury travel vibe, Aon travel insurance might be a better fit, as they often partner with higher-end travel agencies.
Either way, getting insured is a smart move before you jet off!
Amperage Rating and Battery Type
The amperage rating of your battery switch must exceed the maximum current draw of your trailer’s electrical system. Underestimating this can lead to overheating and potential failure. You need to calculate the total amperage draw of all appliances and devices connected to your battery system. For example, if your combined load is 100 amps, you should select a switch with a rating of at least 150 amps to provide a safety margin.
The type of batteries (flooded lead-acid, AGM, lithium) also influences the choice. Lithium batteries, for example, often require switches designed to handle their higher current demands and unique voltage characteristics. Consult your battery manufacturer’s specifications for guidance.
Key Specifications to Check Before Purchase
Before purchasing a battery switch, carefully review these key specifications:
- Amperage Rating: As discussed, this must exceed your system’s maximum current draw. Always err on the side of caution and choose a higher rating.
- Voltage Rating: This should match the voltage of your battery bank (typically 12V or 24V). Using an incorrectly rated switch can lead to damage or malfunction.
- Number of Batteries: Some switches are designed for single battery setups, while others accommodate multiple batteries in parallel or series configurations. Ensure the switch supports your specific configuration.
- Switch Type: Consider the type of switch: rotary, rocker, or other. Rotary switches are common for their simplicity, while rocker switches can be more convenient in some installations.
- Mounting Style: Check the mounting style (panel mount, surface mount) to ensure it’s compatible with your installation location.
- Protection Features: Look for features like overcurrent protection (fuses or circuit breakers) to enhance safety.
- Manufacturer’s Warranty: A good warranty indicates confidence in the product’s quality and durability.
Comparison of Battery Switch Brands and Models
Several reputable brands manufacture battery switches for RVs and travel trailers. While specific models and pricing fluctuate, it’s important to consider features and reliability. For instance, Blue Sea Systems is known for its high-quality, marine-grade switches, often featuring robust construction and advanced protection features, but generally at a higher price point. Other brands offer more budget-friendly options, but it’s crucial to carefully examine their specifications and reviews to ensure they meet your needs and safety standards.
Comparing features like amperage rating, number of battery banks supported, and the presence of safety features (like built-in fuses or circuit breakers) is vital before making a purchase. Always prioritize safety and reliability when selecting a battery switch.
Safety Considerations with Battery Switches
Working with the electrical systems in a travel trailer involves inherent risks, especially when dealing with batteries and high-amperage circuits. Improper handling can lead to serious injury, including electric shock, burns, and even explosions. Understanding and adhering to safety protocols is paramount to prevent accidents and ensure a safe working environment.Working with batteries and electrical components requires careful attention to safety procedures.
Failure to follow these precautions can result in serious injury or damage to your trailer’s electrical system. Always prioritize safety; it’s better to take extra precautions than to risk an accident.
Electrical Shock Hazards
Electrical shock is a significant risk when working with any electrical system, including a travel trailer’s battery setup. High-voltage currents can cause severe burns, muscle contractions, cardiac arrest, and even death. Always disconnect the power source before working on any electrical component. Never assume a circuit is de-energized; always double-check using a reliable voltage tester. Working on a live system is incredibly dangerous and should be strictly avoided.
Battery Acid Hazards
Lead-acid batteries contain sulfuric acid, a highly corrosive substance that can cause severe burns to skin and eyes. When working with batteries, wear appropriate eye protection (safety glasses or goggles) and protective gloves (rubber or nitrile). Always handle batteries carefully to avoid spills or leaks. If a spill does occur, immediately neutralize the acid with baking soda and water, then clean the area thoroughly.
Proper ventilation is crucial when working with batteries to avoid inhaling harmful fumes.
Explosion Hazards
Batteries can release flammable hydrogen gas during charging or if damaged. This gas can ignite and cause an explosion if exposed to a spark or flame. Ensure proper ventilation when charging batteries, and never work near open flames or sparks. Always use a battery charger specifically designed for lead-acid batteries, and follow the manufacturer’s instructions carefully. Regularly inspect batteries for damage or leaks; a damaged battery is more likely to release hydrogen gas.
Essential Safety Equipment
Before beginning any work on your travel trailer’s electrical system, gather the necessary safety equipment. This includes:
- Safety glasses or goggles: Protect your eyes from flying debris and battery acid.
- Rubber or nitrile gloves: Protect your hands from battery acid and electrical shock.
- Voltage tester: Verify that power is disconnected before working on any electrical component.
- Insulated tools: Prevent electrical shock by using tools with insulated handles.
- Battery terminal cleaner: Ensure clean and secure connections to prevent arcing and overheating.
- Baking soda and water: Neutralize battery acid spills.
- Fire extinguisher: Be prepared for potential fires.
Remember, safety is paramount. If you are unsure about any aspect of working with your travel trailer’s electrical system, consult a qualified electrician. Taking the necessary precautions can prevent serious injury and ensure the longevity of your trailer’s electrical system.
Mastering your travel trailer’s battery switch isn’t just about convenience; it’s about ensuring safe and reliable power for your adventures. By understanding the different types of switches, their functions, and how to troubleshoot problems, you’ll be prepared for anything. Regular maintenance and a little preventative care will keep your system running smoothly for years to come, maximizing your enjoyment on the road.
So, go forth and power your adventures confidently!
Top FAQs
What happens if my battery switch is faulty?
A faulty switch can lead to anything from intermittent power loss to complete power failure. You might experience flickering lights, non-functioning appliances, or even a dead battery.
How often should I inspect my battery switch?
Ideally, inspect your battery switch every few months, or before and after each extended trip. Look for corrosion, loose connections, or any signs of damage.
Can I replace my battery switch myself?
While possible, replacing a battery switch requires basic electrical knowledge and safety precautions. If unsure, consult a professional RV technician.
What size battery switch do I need?
The appropriate amperage rating depends on your battery bank’s capacity and the total amperage draw of your appliances. Consult your RV’s electrical system documentation or a qualified electrician.
